Bitvis UVVM VHDL Verification Component Framework
-- Copyright (c) 2016 by Bitvis AS.  All rights reserved.
-- You should have received a copy of the license file containing the MIT License (see LICENSE.TXT), if not,
-- contact Bitvis AS <support@bitvis.no>.
-- UVVM AND ANY PART THEREOF ARE PROVIDED "AS IS", WITHOUT WARRANTY OF ANY KIND, EXPRESS OR IMPLIED,
-- INCLUDING BUT NOT LIMITED TO THE WARRANTIES OF MERCHANTABILITY, FITNESS FOR A PARTICULAR PURPOSE AND NONINFRINGEMENT.
-- IN NO EVENT SHALL THE AUTHORS OR COPYRIGHT HOLDERS BE LIABLE FOR ANY CLAIM, DAMAGES OR OTHER LIABILITY,
-- WHETHER IN AN ACTION OF CONTRACT, TORT OR OTHERWISE, ARISING FROM, OUT OF OR IN CONNECTION WITH UVVM.
--========================================================================================================================
Introduction
Bitvis UVVM VVC Framework is a complete framework for making VHDL testbenches for verification of FPGA and ASIC desing. You can download the complete code-base, examples and simulations scripts from the Bitvis web page.
What's in the folders?

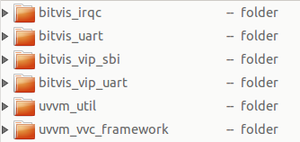
The download includes severals folders:
- bitvis_irqc - example VHDL design + testbench
- bitvis_uart - example VHDL design + testbench
- bitvis_vip_sbi - Verification IP(VIP) for simple bus interface(SBI)
- bitvis_vip_uart - VIP for UART TX and RX
- uvvm_util - UVVM utility library - sufficient for simple testbenches
- uvvm_vvc_framework - Framework for more advanced tutorials
IRQC

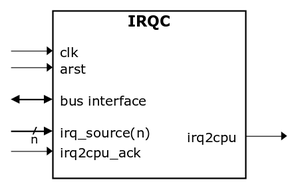
The provided example VHDL design is a simple interrupt controller with several internal registers, a bus interface and some input and output signals.
Testbench creation
Copy the folders bitvis_irqc, bitvis_vip_sbi and uvvm_util to another location before editing the files.
Generate TB entity with DUT instantiated
Our TB entity can in many cases be generated from several tools. Notepad++ (among other) supports plugins that enables copying an entity and pasting it as an instantiation, and also as a complete testbench template. However, we will change some of our signals so that they fit the VIP SBI BFM. The signals to and from the CPU will be converted to t_sbi_if record, which is a type that includes all the SBI signals (cs, addr, rd, wr, wdata, ready and rdata).
--Standard libraries
library IEEE;
use IEEE.std_logic_1164.all;
use IEEE.numeric_std.all;

-- Libraries used for string handling in UVVM
library STD;
use std.env.all;

-- Obviously the UVVM library
library uvvm_util;
context uvvm_util.uvvm_util_context;

-- We will use this library later when implementing the Bus Functional Model
-- Includes among much else the record type t_sbi_if and many functions
-- If other buses are used, you will have to change this library
library bitvis_vip_sbi;
use bitvis_vip_sbi.sbi_bfm_pkg.all;

-- This file includes definitions of everything from registers to record types
use work.irqc_pif_pkg.all;


-- Test case entity
entity irqc_tb is
end entity;

-- Test case architecture
architecture func of irqc_tb is

  -- DSP interface and general control signals
  signal clk           : std_logic  := '0';
  signal arst          : std_logic  := '0';
  -- CPU interface
  -- t_sbi_if is from the verification IP SBI
  -- init_sbi_if_signals initialize the inputs to 0 and the outputs to Z
  signal sbi_if : t_sbi_if(addr(2 downto 0), wdata(7 downto 0), rdata(7 downto 0)) := init_sbi_if_signals(3, 8);

  -- Interrupt related signals
  signal irq_source    : std_logic_vector(C_NUM_SOURCES-1 downto 0) := (others => '0');
  signal irq2cpu       : std_logic := '0';
  signal irq2cpu_ack   : std_logic := '0';

begin

  -----------------------------------------------------------------------------
  -- Instantiate DUT
  -----------------------------------------------------------------------------
  i_irqc: entity work.irqc
    port map (
    -- DSP interface and general control signals
        clk             => clk,
        arst            => arst,
    -- CPU interface
        cs              => sbi_if.cs,             -- NOTICE THE SIGNALS ARE NOW SBI_IF
        addr            => sbi_if.addr,
        wr              => sbi_if.wr,
        rd              => sbi_if.rd,
        din             => sbi_if.wdata,
        dout            => sbi_if.rdata,
    -- Interrupt related signals
        irq_source      => irq_source,
        irq2cpu         => irq2cpu,
        irq2cpu_ack     => irq2cpu_ack
        );

end func;
Add support process for clock generation
We now have to add a support process that controls the clock. This has to allow enabling/disabling from the test sequencer. We add the following before "begin" in our architecture:
-- Added for clock generation
  signal clock_ena  : boolean := false;

  constant C_CLK_PERIOD : time := 10 ns;

  procedure clock_gen(
    signal   clock_signal  : inout std_logic;
    signal   clock_ena     : in    boolean;
    constant clock_period  : in    time
  ) is
    variable v_first_half_clk_period : time := C_CLK_PERIOD / 2;
  begin
    loop
      if not clock_ena then
        wait until clock_ena;
      end if;
      wait for v_first_half_clk_period;
      clock_signal <= not clock_signal;
      wait for (clock_period - v_first_half_clk_period);
      clock_signal <= not clock_signal;
    end loop;
  end;
Our clock can now be activated from the test sequencer (this will be added in the next step):
-- After begin in the architecture
clock_gen(clk, clock_ena, C_CLK_PERIOD);


-- Inside the test sequencer process
clock_ena <= true;
Add test sequencer process
The next step is to add the test sequencer process. This process controls everything from initialization to termination of the simulation.
 -- Set upt clock generator
  clock_gen(clk, clock_ena, C_CLK_PERIOD);

  ------------------------------------------------
  -- PROCESS: p_main
  ------------------------------------------------
  p_main : process
  -- The scope tells you where log messages originates - C_SCOPE tells us they originate from the default test sequencer scope
  constant C_SCOPE     : string  := C_TB_SCOPE_DEFAULT;
  -- This is where we will add some procedures later to simplify the tests

  begin

  --Print the configuration to the log
  report_global_ctrl(VOID);
  report_msg_id_panel(VOID);

  enable_log_msg(ALL_MESSAGES);
  --disable_log_msg
  --enable_log_msg(ID_LOG_HDR);

  log(ID_LOG_HDR, "Start Simulation of TB for IRQC", C_SCOPE);
  ------------------------------------------------------------
  clock_ena <= true;   -- to start clock generator


  ------------------------------------------------------------
  -- End the simulation
  wait for 1000 ns;                       -- to allow some time for completion
  report_alert_counters(FINAL);            -- Report final counters and print conclusion for simulation (Success/Fail)
  log(ID_LOG_HDR, "SIMULATION COMPLETED", C_SCOPE);

  --Finish the simulation
  std.env.stop;
  wait; -- to stop completely
  end process p_main;
Simulation
We now have the skeleton of the testbench, which we will develop further. But now, let's see if everything works. Bitvis have created simulation scripts for the IRQC example that compiles everything we need, from the source files of the VHDL design, to the testbench (if you called the file irqc_tb.vhd and placed it in the tb-folder) and the SBI BFM and the UVVM library. Open up QuestaSim/ModelSim. Change directory to the script folder:
cd ~/phys321/bitviswiki/bitvis_irqc/script
do compile_and_sim_all.do
This will present our result in the transcript windows, but also write _Log.txt file which includes all the information we have asked for. We see that we get the results from the following code:
report_global_ctrl(VOID);
report_msg_id_panel(VOID);
enable_log_msg(ALL_MESSAGES);
log(ID_LOG_HDR, "Start Simulation of TB for IRQC", C_SCOPE);
report_alert_counters(FINAL);
log(ID_LOG_HDR, "SIMULATION COMPLETED", C_SCOPE);
Commenting this out will result in no log whatsoever...

