Print schematics with Cadence: Difference between revisions
m →Tips: Papersize and conversion to other formats |
m →Convert the postscript(ps) to another format: Save to File/PDF |
||
| Line 108: | Line 108: | ||
Results in a nice PDF to put in reports/theses. The conversion can also be changed to .png or .jpg | Results in a nice PDF to put in reports/theses. The conversion can also be changed to .png or .jpg | ||
An alternative way to convert is to open the outpus.ps in a PDF viewer. Choose "Print" and "Print to File" and save the file as a PDF. | |||
[[Category:Mikroelektronikk]] [[Category:Integrated_Circuts]] | [[Category:Mikroelektronikk]] [[Category:Integrated_Circuts]] | ||
Revision as of 14:50, 22 March 2018
Print schematics from Cadence Virtuoso
This article will show you how to save your schematics in a vectorised format so they can be manipulated or embedded in a report or a thesis.
Doing it this way, instead of "Export image" will result in something that looks useable and high resolution.
It is based on this youtube-movie https://www.youtube.com/watch?v=JivgqYabhWI
Procedure
1. Locate the file containing the plotter-setups. It comes with the technology package and is located here:
/eda/cadence/2016-17/RHELx86/IC_6.1.7.704/tools.lnx86/plot/etc/cdsplotinit
2. Move the file to your own tsmc-folder
mv /eda/cadence/2016-17/RHELx86/IC_6.1.7.704/tools.lnx86/plot/etc/cdsplotinit ~/tsmc/.cdsplotinit

3. Rename "your plotter": Change line 18, "Encapsulated PostScript:" to "p1|Encapsulated PostScript:"
gedit ~/tsmc/.cdsplotinit
or
vim ~/tsmc/.cdsplotinit
- If you get the error *Error* lessp: can't handle (nil <nil) you have to restart virtuoso for the plotters to be enabled
4. Now to print. First you might want to set a paper size. This is done here:
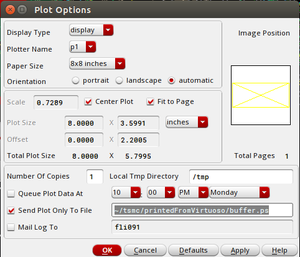
File - Print - Plot Options ... - Paper Size
Make sure the "Plotter Name" is what you called your plotter (p1).
5. Check the boxes "Fit to Page" and "Center plot"
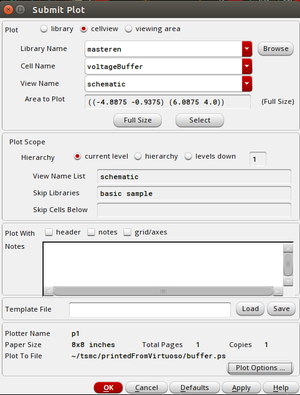
6. Uncheck the the box "Mail Log To" and check the box "Send Plot Only To File" and set the path to where you want your plots/prints/schematics to be stored. This is also where you decide on a filename
~/tsmc/printedFromVirtuoso/voltageBuffer.ps

7. Make sure the folder you have set to save your files in exist or Virtuoso will just output a warning ala
*WARNING* (SCH-1266): Cannot write to file "~/tsmc/printedFromVirtuoso/buffer.ps".
Create the folder:
mkdir ~/tsmc/printedFromVirtuoso/
8. Click OK in the Plot Options windows
9. Uncheck the "Plot with: header" box, just above the notes window
10. Press OK to save the schematic.
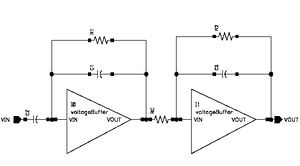
Now you can open the output.ps-file and it will look something like this:

For the next schematics you want to plot you only have to "File - Print - Plot Options ...", change your filename and press OK.
Tips
Disable all annotations
Do the following twice, once to enable this (and disable anything else) and the one more time to disable it again
View - Annotations - Component Parameters
This will make the schematic look cleaner and will hide fingers and channel lengths, etc. You could also do the same with net names, and possibly hide instance labels
View - Hide Instance Labels
Wider lines
Open the outputfile (.ps) in a text editor and find
setlinewidth
This set the width of all lines and can be changed to i.e. 2 for wider lines.
2 setlinewidth
Note: if you have text (not disabled annotations etc) the letters might mix together.
Sizing the "paper"
Changing the papersize from 5x5 to "unlimited" results in a larger plot, the filesize increased to 125%, but since PS is not a bitmap this is irrelevant as the schematic can be scaled to whatever size.
Convert the postscript(ps) to another format
On linux there are several tools that easily converts. For example
ps2pdf output.ps output.pdf
Results in a nice PDF to put in reports/theses. The conversion can also be changed to .png or .jpg
An alternative way to convert is to open the outpus.ps in a PDF viewer. Choose "Print" and "Print to File" and save the file as a PDF.
