Running FreeRTOS on Xilinx Zybo: Difference between revisions
No edit summary |
mNo edit summary |
||
| (6 intermediate revisions by the same user not shown) | |||
| Line 1: | Line 1: | ||
Tested on Xilinx Vivado/SDK 2017.3, Ubuntu 16.04 LTS. | Tested on Xilinx Vivado/SDK 2017.3, Ubuntu 16.04 LTS. | ||
Tutorial heavily based on: | |||
#REDIRECT [[http://rishifranklin.blogspot.no/2015/04/freertos-on-xilinx-zynq-zybo-single-core.html]] | |||
This tutorial assumes you have completed the "[[Creating example project with AXI4 Lite peripheral in Xilinx Vivado]]"-tutorial. | This tutorial assumes you have completed the "[[Creating example project with AXI4 Lite peripheral in Xilinx Vivado]]"-tutorial. | ||
| Line 24: | Line 26: | ||
FreeRTOS_tick_config.c<br /> | FreeRTOS_tick_config.c<br /> | ||
main.c<br /> | main.c<br /> | ||
platform.c<br /> | |||
platform.h<br /> | |||
platform_config.h | |||
printf-stdarg.c<br /> | printf-stdarg.c<br /> | ||
<br /> | <br /> | ||
| Line 34: | Line 39: | ||
tasks.c<br /> | tasks.c<br /> | ||
timers.c<br /><br /> | timers.c<br /><br /> | ||
\FreeRTOSV8.2.1\FreeRTOS\Source\include\<br /> | \FreeRTOSV8.2.1\FreeRTOS\Source\include\<br /> | ||
| Line 54: | Line 58: | ||
\FreeRTOSV8.2.1\FreeRTOS\Source\portable\MemMang\<br /> | \FreeRTOSV8.2.1\FreeRTOS\Source\portable\MemMang\<br /> | ||
heap_4.c<br /><br /> | heap_4.c<br /><br /> | ||
\FreeRTOSV8.2.1\FreeRTOS\Source\portable\GCC\ARM_CA9\<br /> | \FreeRTOSV8.2.1\FreeRTOS\Source\portable\GCC\ARM_CA9\<br /> | ||
| Line 66: | Line 69: | ||
Edit the highlighted line to the lscript.id file located in the SDK project source folder: | Edit the highlighted line to the lscript.id file located in the SDK project source folder to contain "*(.freertos_vectors)": | ||
[[File:lscript_id_edit.png|400px|center]]<br /> | [[File:lscript_id_edit.png|400px|center]]<br /> | ||
| Line 73: | Line 76: | ||
<br /> | <br /> | ||
= Setting CPU frequency = | |||
Next we should configure the CPU to run at 50MHz in the FreeRTOSConfig.h file by editing the configCPU_CLOCK_HZ parameter: | Next we should configure the CPU to run at 50MHz in the FreeRTOSConfig.h file by editing the configCPU_CLOCK_HZ parameter: | ||
[[File:FreeRTOSConfig_cpu_freq_edit.png|400px]|center] | [[File:FreeRTOSConfig_cpu_freq_edit.png|400px|center]] | ||
= Write the application = | |||
Go back into Xilinx SDK and refresh(F5). All the added files should now be visible in the project explorer. | |||
Open main.c, and comment out the call to ''vParTestInitialise()'' from the ''prvSetupHardware'' function as it is not related to the Zybo board. | |||
Also comment out all the included headerfiles under "Standard Demo Include:<br /> | |||
[[File:remove_include_demo_libs.png|400px|center]]<br /> | |||
Also set ''#define mainSELECTED_APPLICATION 0'' instead of 1. It should be located around line 141. | |||
Add ''#define AXI_LED_BASE 0x43c30000'' somewhere in the top of the code, but not within any functions, for example right after all the #includes. | |||
Time to write the actual code. Add the following as a function before main: | |||
[[File:AXILedBlink_code.png|400px|center]]<br /> | |||
<br /> | |||
The last thing we need to do code vise, is to call the function we just created in the main function: | |||
[[File:main_code.png|400px|center]]<br /> | |||
<br /> | |||
Save, then goto ''Project --> Build All''. | |||
Time to test the software! Bring up your favorite Xilinx Zybo SoC board, and ensure that jumper 5 (JP5) is configured for booting via JTAG. Connect the board to the computer, and power it up. Then in Xilinx SDK, goto ''Xilinx --> Program FPGA''. If successful, goto ''Run --> Run as --> 1 Launch on Hardware (System Debugger)''. The 4 LEDs on the board should now light up and blink. | |||
End of tutorial! | |||
Latest revision as of 13:58, 9 January 2018
Tested on Xilinx Vivado/SDK 2017.3, Ubuntu 16.04 LTS. Tutorial heavily based on:
- REDIRECT [[1]]
This tutorial assumes you have completed the "Creating example project with AXI4 Lite peripheral in Xilinx Vivado"-tutorial.
Running FreeRTOS on Xilinx Zybo
This tutorial will help in setting up Xilinx Zybo SoC-board to run FreeRTOS with an example project that toggles the LEDs on the board. It assumes that the user has successfully exported the hardware bitstream from the Xilinx Vivado project created in the previous tutorial linked at the top.
Setup SDK
Launch Xilinx SDK from the project in Xilinx Vivado: File --> Launch SDK.
Create a new application project with File --> New --> Application Project and name it "FreeRTOS_example_project". Use C as language, standalone as OS. Click next, select "Empty Application", and finish.
Acquire FreeRTOS
Download and extract FreeRTOS available at the FreeRTOS homepage:
- Homepage [[2]]
Add FreeRTOS to the project
Open the extracted folder, and copy the following files into the SDK project source folder located at: \axi3_lite_tutorial_project\axi4_lite_tutorial_project.sdk\FreeRTOS_example_project\src\
\FreeRTOSV8.2.1\FreeRTOS\Demo\CORTEX_A9_Zynq_ZC702\RTOSDemo\src\
FreeRTOS_asm_vectors.S
FreeRTOSConfig.h
FreeRTOS_tick_config.c
main.c
platform.c
platform.h
platform_config.h
printf-stdarg.c
\FreeRTOSV8.2.1\FreeRTOS\Source\
croutine.c
event_groups.c
list.c
queue.c
tasks.c
timers.c
\FreeRTOSV8.2.1\FreeRTOS\Source\include\
croutine.h
deprecated_definitions.h
event_groups.h
FreeRTOS.h
list.h
mpu_prototypes.h
mpu_wrappers.h
portable.h
projdefs.h
queue.h
semphr.h
StackMacros.h
task.h
timers.h
\FreeRTOSV8.2.1\FreeRTOS\Source\portable\MemMang\
heap_4.c
\FreeRTOSV8.2.1\FreeRTOS\Source\portable\GCC\ARM_CA9\
port.c
portASM.S
portmacro.h
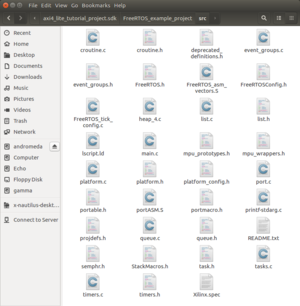
Your SDK project source folder should now look like this:
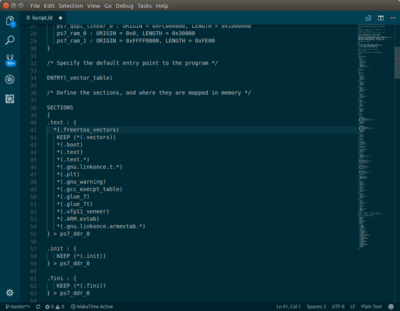
Edit the highlighted line to the lscript.id file located in the SDK project source folder to contain "*(.freertos_vectors)":
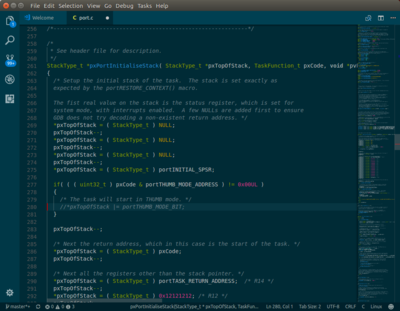
Comment out "*pxTopOfStack |= portTHUMB_MODE_BIT;" on line 280 in port.c to avoid FreeRTOS to run in thumb-mode:
Setting CPU frequency
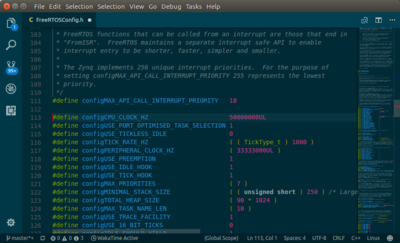
Next we should configure the CPU to run at 50MHz in the FreeRTOSConfig.h file by editing the configCPU_CLOCK_HZ parameter:
Write the application
Go back into Xilinx SDK and refresh(F5). All the added files should now be visible in the project explorer.
Open main.c, and comment out the call to vParTestInitialise() from the prvSetupHardware function as it is not related to the Zybo board.
Also comment out all the included headerfiles under "Standard Demo Include:
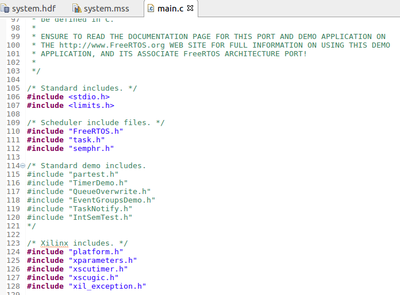
Also set #define mainSELECTED_APPLICATION 0 instead of 1. It should be located around line 141. Add #define AXI_LED_BASE 0x43c30000 somewhere in the top of the code, but not within any functions, for example right after all the #includes.
Time to write the actual code. Add the following as a function before main:
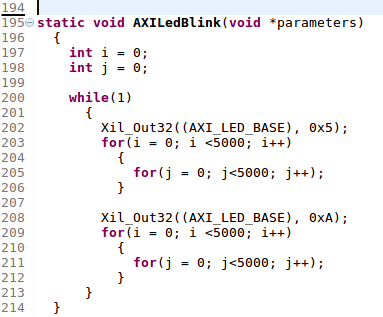
The last thing we need to do code vise, is to call the function we just created in the main function:
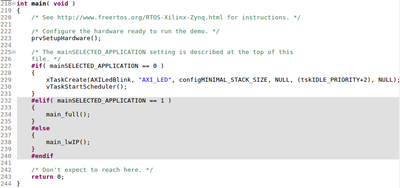
Save, then goto Project --> Build All.
Time to test the software! Bring up your favorite Xilinx Zybo SoC board, and ensure that jumper 5 (JP5) is configured for booting via JTAG. Connect the board to the computer, and power it up. Then in Xilinx SDK, goto Xilinx --> Program FPGA. If successful, goto Run --> Run as --> 1 Launch on Hardware (System Debugger). The 4 LEDs on the board should now light up and blink.
End of tutorial!
